How to Use the LA Parks Portal
Contents
- About the LA Parks Portal
- Video Overview
- Browser Requirements
- What is the Park inventory all about?
- Using the Public Map
- For Park Owners and Managers
- Privacy Policy
About the LA Parks Portal
The LA Parks Portal from the Regional Park and Open Space District shows the most recent published inventory data and allows park agencies to update their Los Angeles Countywide Parks & Needs Assessment park inventory data as required by Proposition A and Measure A.
This documentation page highlights how to use the portal to view and manage the Measure A park and amenity inventory.
For information on the Los Angeles Countywide Comprehensive Parks Recreation Needs Assessment, please visit website at lacountyparkneeds.org.
For information on Los Angeles County Regional Park and Open Space District, Measure A and Proposition A, please visit our website at rposd.lacounty.gov.
If you have any questions about this portal, email us at info@laparksportal.org.
Video Overview
Browser Requirements
LAparksportal.org works best in current versions of Chrome, Firefox, Safari, and Microsoft Edge on a laptop or desktop computer. It has not been tested and is not supported on Internet Explorer (which is past end of life and no longer supported by Microsoft).
What is the Park inventory all about?
In 2016, the voters of Los Angeles County approved Measure A, a landmark park funding measure based on a Park Needs Assessment (PNA). The PNA included a countywide inventory of parks, analysis of park need, and community engagement process. Measure A includes a provision that requires ongoing annual updates of that park inventory. This website provides people who own and manage parks with the tools they need to update their inventories and stay in up to date with Measure A’s requirements.
You can read more about Measure A programs on the RPOSD website here. A key part of the park inventory is tracking the presence and condition of a defined set of 16 amenities. This guide lists the amenity types and includes text and photo guidance on how to assess whether each one is in Good, Fair, or Poor condition.The rest of this documentation will help you use the inventory portal to update your inventory and keep track of the overall status of your park and amenity data for compliance with Measure A requirements.
We’ve included brief guidance for using this portal specifically for Park owners and Managers completing a park inventory. You need to log in to update the most recent public data. Staff completing the inventory should check with their grant manager for additional guidance.
Please don’t hesitate to reach out to the team at info@laparksportal.org with questions or concerns using the portal.
Using the Public Map
The laparksportal.org displays county-wide parks and amenity data as last published by all the agencies that own and manage parks across Los Angeles County. You do not need to log in to see the most recent public data.
Find a Park
You can find parks by browsing the map, search by name, or selecting an agency from the list to see their parks. Find what you're looking for in three ways:
- Use the web map to pan and zoom to a park of interest, then click that park to see it’s details on the left.
- Use the search by park name or city box to enter text that will bring up parks by name or that contain the name of the city you entered.
- Use the search by agency box to select a specific agency to view their parks.
Color parks on the map by different values
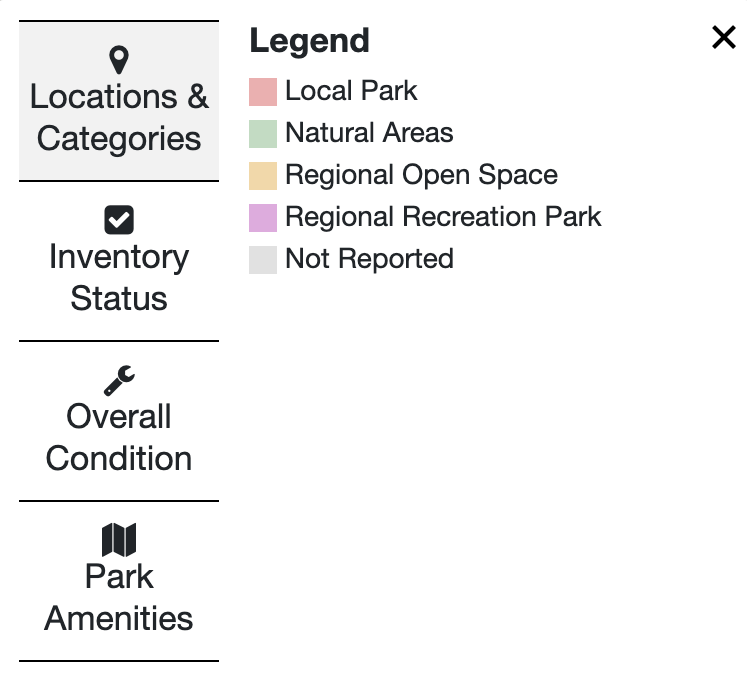
The menu on the lower right of the home page map screen allows you to color in parks by various attributes:
- Locations and Categories (to show by type, Local Park, Natural Areas, Regional Open Space, Regional Recreation Park, or Not Reported)
- Inventory Status (Current, Outdated)
- Overall Condition (Good, Fair, Poor, Not Reported)
- Park Amenities
- Number of Amenity Types (None up to 16)
- Count of amenities, one type at a time for the 16 Measure A types
For Park Owners and Managers
The LA Parks Portal includes a record for each agency or nonprofit that owns or manages parks in Los Angeles County, and then each agency has at least one Agency Manager and can have any number of Agency Editors. Each role is allowed a predefined set of tasks and responsibilities.
Managing Users
Roles and Responsibilities
Agency Managers can edit all park and amenity data, create new parks, and publish changes for the official inventory to be used by RPOSD and made visible to the public.
Agency Editors can edit all park and amenity data and create new parks, but then they must submit those changes for review to their Agency Manager.
The first person who signs up for your organization will be set an Agency Manager. That person can then approve all other signups themselves and decide if others should have Manager or Editor privileges. If RPOSD approves multiple users at once, they will make the first one Manager and the rest Editor, but the Manager is free to promote others to Manager. There needs to be at least one Manager for each Organization.
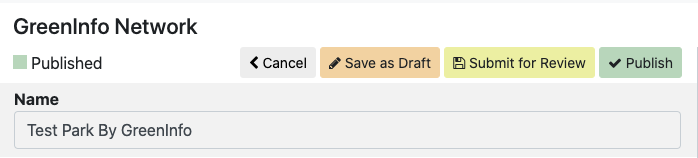
Save as Draft, Submit for Review and Publish
There are multiple ways to save a park entry at the top of the page depending on your editing permissions:
- Save as Draft option available to Agency Managers and Editors. Saves a copy only visible to you. You can continue your edits later.
- Submit for Review option only available to an Agency Editor. Shares the park entry with an Agency Manager for review before publishing to the park inventory. The Agency Editor cannot continue making edits. At this point only the Agency Manager can make edits.
- Publish option only available to an Agency Manager. The park entry will be made available for review by the RPOSD Grant Manager. The publish button also makes the information visible on the public map after review by RPOSD.
Note: If you publish a park, it will be completely accessible to the RPOSD Grant Manager and to the public on the home page map and no further edits will be possible at that moment in time. Any new changes would need to be republished.
This video shows the publishing workflow in more detail:
The roles of Agency Managers and Agency Editors are defined and assigned upon signing up. The process is described in more detail below.
When appropriate, each section thereafter will explain when the tasks and responsibilities differ from one role to the other.
Signing Up
I need to sign up and manage my agency’s data
- Go to laparksportal.org
- Click on the Log In link in upper right
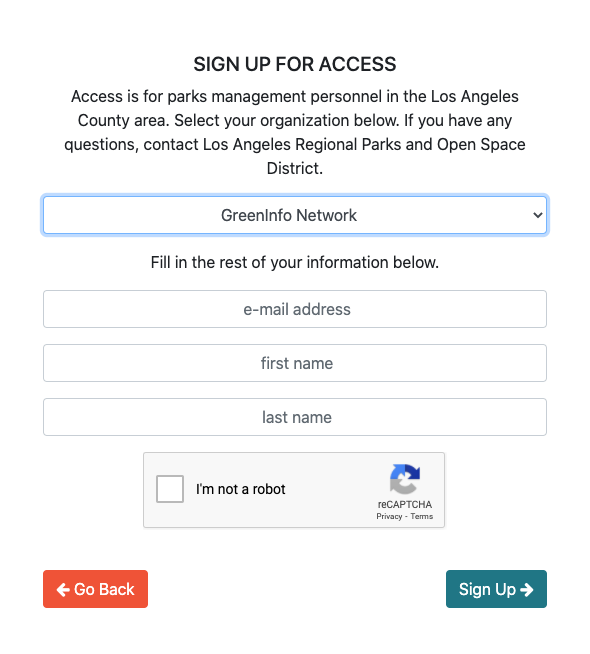
- Click Sign Up on the login screen. You can also navigate directly to laparksportal.org/signup/
- Next, select your agency from the dropdown and fill out the fields that appear on the next screen.
- An email will be sent on your behalf to review your request to signup. Note: If you are the first person from your agency to sign up, an email will be sent to the managers of the website to approve your request and create your account. If you already have an Agency Manager at your organization, they will be notified and can review and approve your request.
- Upon approval, you’ll receive an email from info@laparksportal.org with your password, which you can also reset in your User Profile or by using the Forgot Password link on the login page. If you don’t see the email, check your spam folder.
Important: In the case you are the single user for your agency, in effect, you will be the Agency Manager. As such, you are responsible for all tasks and the only one to have access to admin capabilities.
I need to sign up to work with my agency manager to update data
To sign up to work with an Agency Manager means that you will be considered an Agency Editor. The process to sign up as an Agency Editor is the same as described above in steps 1 through 6 for an Agency Manager. In the case of an Agency Editor, either the RPOSD grant manager or your Agency manager can approve your request and create your account.
Approving Signups for Your Agency
When a new user signs up, an email will be sent to any Agency Manager accounts that exist for your agency and to info@laparksportal.org. That email will include a link to the Signup page so you can review and approve the signup, which will create an account for that user and send them an email with their credentials.
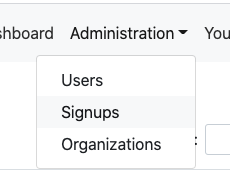
You can navigate to the Signups section directly by clicking Administration in the top bar and then clicking Signups.
When you review a new Signup, you’ll see a screen like this:

And then this:
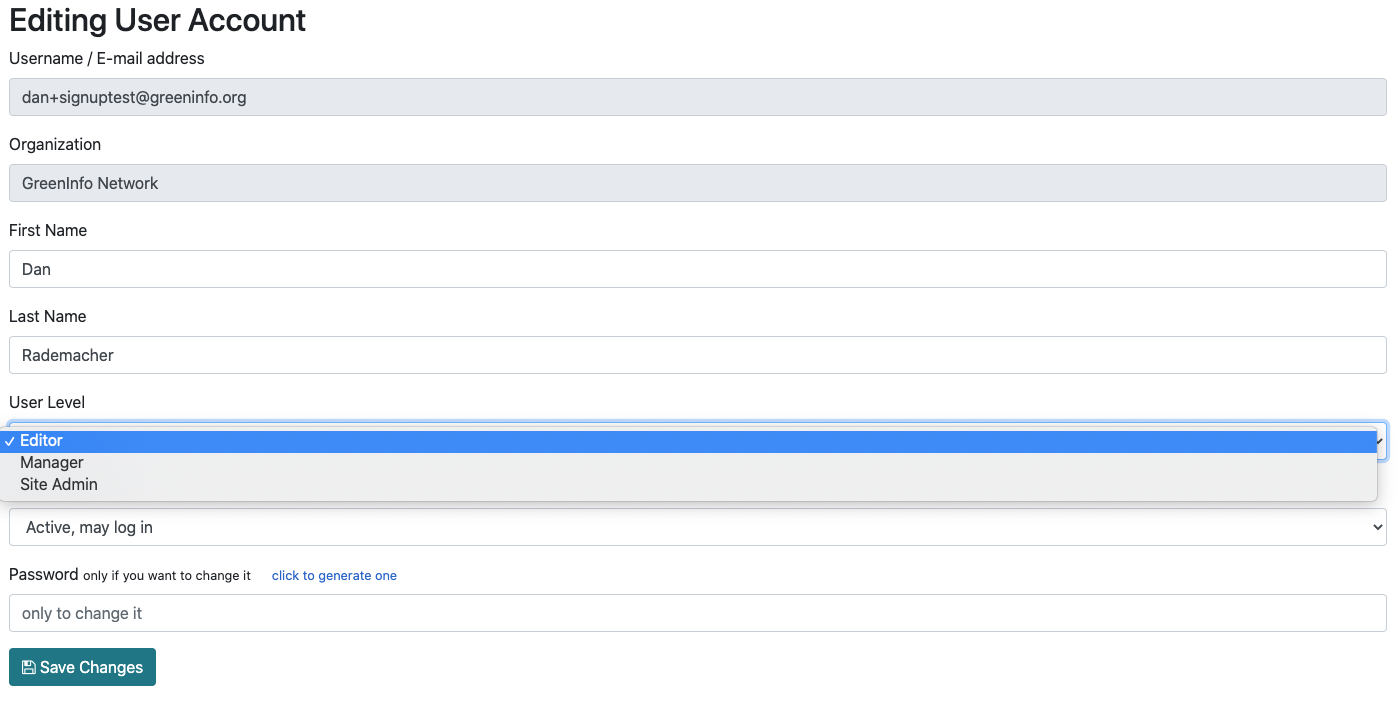
If the user should also be an Agency Managers, make sure to set the permissions level to allow them to access all the features they’ll need for their role. They will receive an email with an automatically generated password, so you can leave all the other fields as is.
Disabling User Accounts
If a user leaves an agency and their account needs to be deactivated, you can do that by selecting Administration from the top bar, and then Users. Select the relevant user record from the table and change their Account Status to “Inactive, may not log in” as shown here:

Save your changes. If they attempt to log in, they will get a message letting them know their account has been disabled.
Managing Data
Updating Data
I need to update the condition data for existing parks. How do I know which ones need updates?
There are two easy ways to view your existing park entries on the Dashboard: a list of highlighted parks on the Dashboard or Review Park button.
The best place to look is your Dashboard. Here you will find a quick overview of your inventory status, with shortcuts to the parks that need review. Alternatively use the Review Parks to access the full list of parks:
- Go to laparksportal.org/dashboard/ or click Dashboard.
- To find the park list, click Review Parks.
- Scroll through the list. When you’ve identified a park entry to review, click View (
 ) on the far right of the park’s name to review but not edit a park’s information.
 - Alternatively, click Edit (
 ) on the far right of the park’s name to start making changes.
The most common changes will be to:
- Overall park condition if you have made improvements, or if the condition has deteriorated.
- Or to the Specific Amenities in the park and their condition, again if anything has been added or if any have been improved or gotten worse over time.
How do I update existing Amenity data for a single park?
Update amenity data easily in the single park entry. You can change the condition count for any existing type of amenity, and you can also add a new specific type of amenity if you have added amenities to this park. The steps below describe how to update existing amenity data for a single park.
Learn about the different ways to add new amenities by visiting the Adding new parkland and amenities section.
To update existing data for a single park:
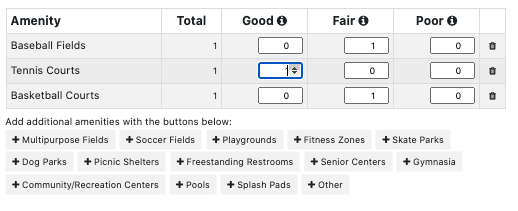
The Amenity table looks like this:
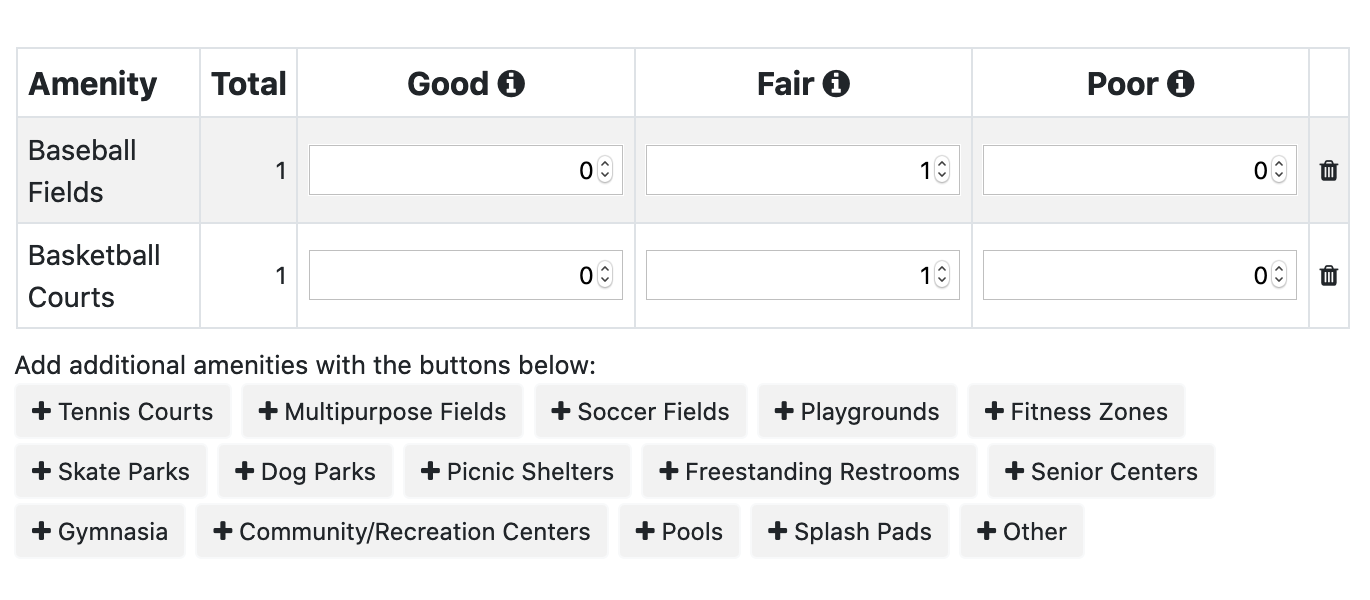
- On your park list, open a park entry.
- To see the amenities, scroll down on the right side.
- You can change the condition count for any existing type of amenity by selecting a new number under the standardized system of ranking “Good”, “Fair” or “Poor”.
- Scroll back up and choose an option to save your work at the top of the sidebar. Note: We recommend you Save as Draft at this point for added flexibility. Once you are finished and certain all your data is correct click Submit for Review or Publish.
Learn about the different ways to save a document by visiting the Save as Draft, Submit for Review and Publish section.
We did some capital improvements on multiple parks. How do I update condition data for a specific amenity type across multiple parks?
You have made upgrades to all amenities of a specific type and want to review those across all your parks. The best place to look is your Dashboard.
- Go to https://www.laparksportal.org/Dashboard/ or click Dashboard.
- To find the park list, click Review Amenities.
- Scroll through the list. When you’ve identified an amenity to review, click View () on the far right of the amenity to review in what parks that type of amenity is located.
- Click Edit () on the far right of the amenity to start making changes to existing amenities in a park.
- Alternatively, select an existing park from the dropdown menu and click Add + to add new amenity information.
- Repeat step 9 to add a specific type of amenity across all your parks.
The most common changes will be to:
- Quantity of amenities.
- Overall amenity condition if you have made improvements, or if the condition has deteriorated.
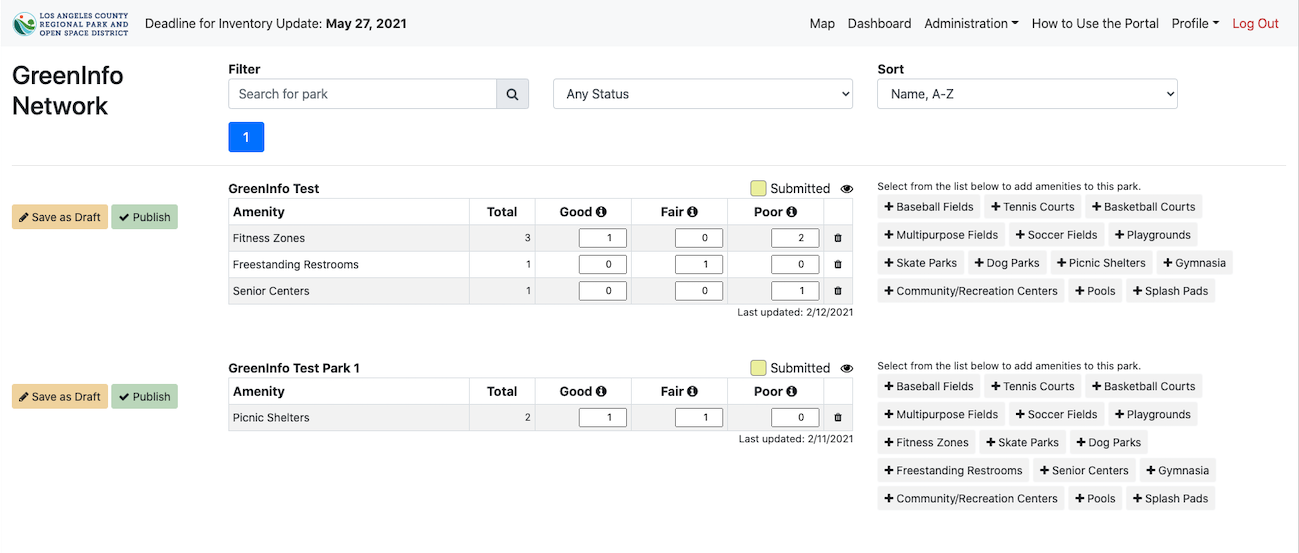
How can I review amenities of all types for many parks at once?
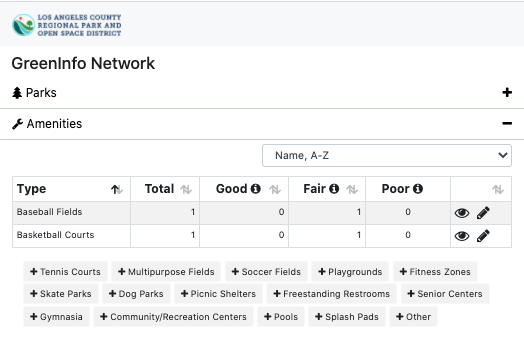
From the Dashboard, you can click on the "Amenities List Review" button, as shown here, to access a list view to allow you to quickly review and update amenities data when no other attributes of a park need review.
This button brings you to a list of all of your parks, where you can sort and search for specific parks, update existing amenities data, add new amenities, and rapidly save, submit, or publish those changes. That layout is shown below. Each park listing notes the park's publication status, existing amenities data, and last update date. Clicking the eye icon () in the upper right of the table will open a view of that park on the map and show all park attributes.
How do I review and publish updates made by others on my team, so that RPOSD will see the updated inventory information?
Agency Managers and Agency Editors have predefined yet different sets of tasks and responsibilities.
How you review and publish updates made by others depends on your role. Agency Managers and Agency Editors can edit existing park entries. However, the Agency Manager is the only one allowed to publish the data. Publishing the data makes it available to the RPOSD Grant Manager and the public portal.
Learn about the different ways to save a document by visiting the Save as Draft, Submit for Review and Publish section.
Reviewing existing data added by others as an Agency Editor:
- Go to laparksportal.org/Dashboard/ or click Dashboard.
- Next to the welcome message, find the title Needs Review to the right and click Review.
- Select a park entry to review.
- Click Edit () on the far right of the park’s name to review or edit the park information.
- To submit the changes for review by an Agency manager, click Submit for Review.
- Repeat steps 1-5 for each park entry that needs to be reviewed.
Then your Agency Manager would review those changes and publish them. Only when a Manager publishes a park is the inventory for this park fully updated.
Reviewing existing data added by others as an Agency Manager:
- Go to https://www.laparksportal.org/Dashboard/ or click Dashboard.
- Next to the welcome message, find the title Needs Review to the right and click Review.
- Select a park entry to review.
- Click Edit () on the far right of the park’s name to review or edit the park information.
- To publish the changes, click Publish.
- Repeat steps 1-5 for each park entry that needs to be reviewed. Note: Remember to also review recently submitted changes for review under Submitted for Review.
Reviewing and publish changes submitted for review by others in your agency as an Agency Manager:
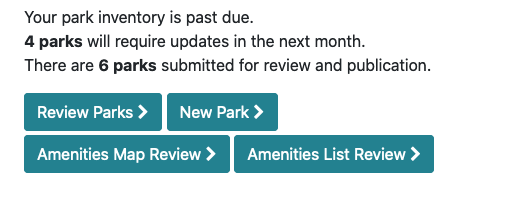
- Go to https://www.laparksportal.org/Dashboard/ or click Dashboard.
- Under your Agency’s name, find out how many parks have been submitted by review by reading the text “There are X parks submitted for review and publication.”
- Next to that message, find the title Submitted for Review to the right and click Review.
- Find a park entry to review from the list.
- To view the park data for a specific park, click View () on the far right of the park’s name.
- To see recent changes, view the top item listed under Edit History towards the bottom of the park entry.
- Alternatively if you are ready to publish, click Edit () on the far right of the park’s name.
- To publish, click Publish.
- Repeat steps 1-8 for each park entry that has been Submitted for Review.
Only when you publish a park is the inventory for the park fully updated.
Adding new parkland and amenities
We converted land into an entirely new park. How do I add an entirely new park to the system?
You can add a new park by adding the geography, park information and amenities in the park.
- Geography - lets you define the shape of the park by drawing with your cursor clicking on points on a map.
- Park information - text fields and dropdown selections that allow you to define the location of the park, it’s characteristics and conditions to name a few.
- Amenities - multiple choice buttons for you to add 16 common types of resources to a park.
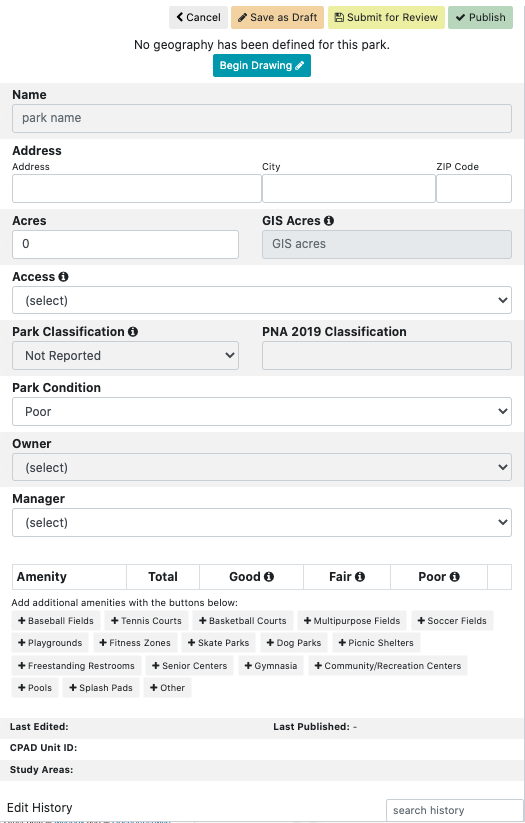
To add a new park:
- On your Dashboard, click Map
- On the right corner of the sidebar, click the button + Add a New Park under Parks
- On the new Park entry, click Begin Drawing
- Click on the map to begin drawing an area and continue clicking to define the area of your park
- Connect back to the first point to connect your points and finish your shape
- Enter a name for your park under Name. Note: You can continue to add information at this point or return at a later time. Before you leave the park entry remember to save your work to date.
- Continue to work where you want to complete your Park entry:
- Address to enter the physical address for your park.
- Acres to enter the acreage you want to report for your park under. Note: GIS Acres cannot be edited. GIS Acres is calculated using ArcPro Calculate Geometry Tool, Teale Albers NAD 83. This may differ from hand-entered acreage values.
- Access to indicate using the dropdown whether people can enter the space and level of entry
- Park Classification to indicate using the dropdown the dominant character and principal values of the park defined. Note: Additional details are available in the document Los Angeles Countywide Comprehensive Parks and Recreation Needs Assessment
- Park Condition to indicate using the dropdown the overall state of the park.
- Owner to indicate using the dropdown the agency that owns the park
- Manager to indicate using the dropdown the entity that operates the park. Note: The manager may be the same as the owner. If the manager is the same as the owner, then choose that from the dropdown list.
- Under Amenity, record the quantity and condition of each amenity type. Use the standardized system of ranking the condition as “good”, “fair”, or “poor”.
- Scroll back up and choose an option to save your work at the top of the sidebar. Note: We recommend you Save as Draft at this point for added flexibility. Once you are finished and certain all your data is correct click Submit for Review or Publish.
Learn about the different ways to save a document by visiting the Save as Draft, Submit for Review and Publish section.
We built some new amenities, I need to add the new amenities to the inventory.
You can choose two different ways to add the 16 common new amenities and their quantities to your park inventory.
Add one or multiple amenities to a single existing park entry:
- On your Dashboard, click Map
- On your park list, click Edit () on the far right of the park’s name to edit the amenities.
- To see the amenities, scroll down on the right side.
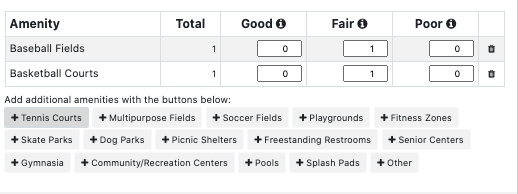
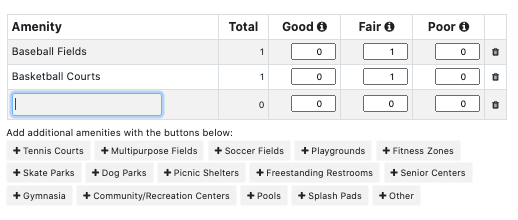
The Amenity table in a park entry looks like this:
- To add a new amenity, under Add additional amenities with the buttons below: click one of the available + add multiple choice buttons (E.g. + Tennis Court) to add a new row to the table above.
- Add a number for each new amenity under the standardized system of ranking “Good”, “Fair” or “Poor”.
- Scroll back up and choose an option to save your work at the top of the sidebar. Note: We recommend you Save as Draft at this point for added flexibility. Once you are finished and certain all your data is correct click Submit for Review or Publish (for Agency Managers).
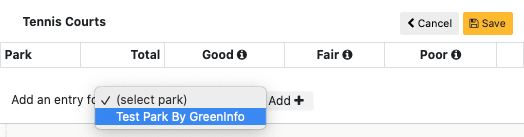
Add the same type of amenities across multiple parks:
- On your Dashboard, click Map
- On the right lower corner of the sidebar, click the + button under Amenities
- To add a new amenity, click one of the available + add multiple choice buttons (E.g. + Tennis Court) to add a new row to the table above.
- To select a park, click the dropdown menu next to Add an entry for, then select the name of the park.
- Click Add +
- Add a number for each new amenity under the standardized system of ranking “Good”, “Fair” or “Poor”.
- Scroll back up and choose an option to save your work at the top of the sidebar. Note: We recommend you Save as Draft at this point for added flexibility. Once you are finished and certain all your data is correct click Submit for Review or Publish.
My park has other amenities not listed here that I would like to add. How do I list them?
The 16 common amenities were agreed upon by the Steering Committee of the Los Angeles Countywide Parks and Recreation Needs Assessment yet you can add amenities not listed as “Other” in the LA Parks Portal. The “Other” open field allows you to add general park infrastructure such as signage, parking lots, walkways, security lighting, park furniture, irrigation, landscaping, volleyball courts, accessibility accommodations, etc.
- In the Amenities table, click + Other to add a new row to the table.
- Write a name for your amenity
- Add a number for each new amenity under the standardized system of ranking “Good”, “Fair” or “Poor”.
- Repeat steps 1-3 for each amenity you want to add to your park entry.
We bought some land to add to an existing park. How do I add that to the inventory?
You acquired some land and want to add it to a park that exists in the inventory.
- On your Dashboard, click Map
- On your park list, click Edit () on the far right of the park’s name to edit the park.
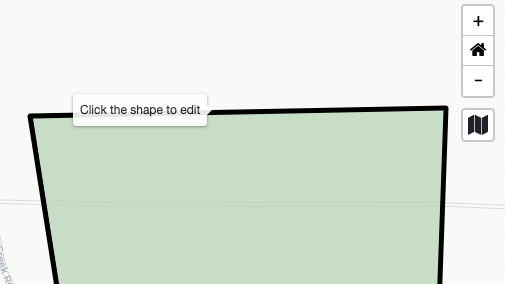
- Mouse over the boundary of the park and you’ll see a “Click the shape to edit”
- Small handles will appear and you can drag those to reshape the park. You can add a new handle between any two existing points.
- When you save, the green park fill will update to the new shape.
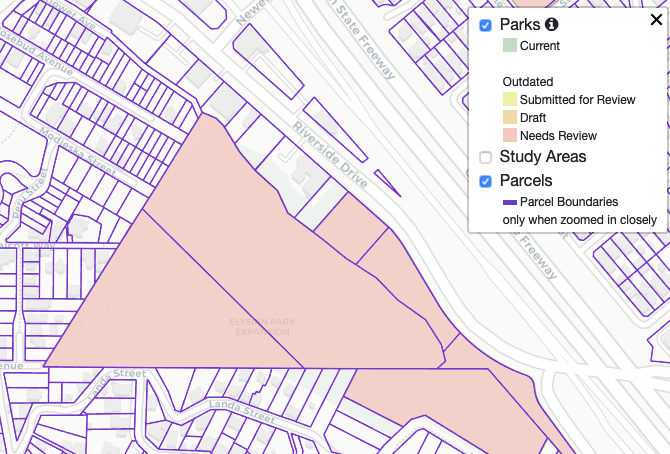
You can also enable Parcel Boundaries to help align your shape with the relevant parcel boundaries.

Reaffirm your existing data in the park portal
We have some parks that are in the same state as last inventory. How do we mark those?
You may not have made significant changes to your parks since the last inventory. If your parks are in the same state as your last inventory, help your grant manager know that the information in the portal “up to date” in the following way:
- To access the park data, click Edit () on the far right of the park’s name.
- To update the publish date, click Publish
Note: Only an Agency Manager can publish changes for the official inventory to be used by RPOSD and made visible to the public. If you are an Agency Editor, please contact your Agency Manager to complete these steps and reaffirm your existing data in the park portal is up to date.

View activity and track specific past edits
Someone changed a park’s data. How do I know who changed what so I can follow up with them?
See changes made to the park inventory in the park entry and keep track of who made those changes. You might see tracked changes when someone:
- Adds an amenity
- Changes park fields
- Changes the status of a park entry
View past edits and track changes:
- To access the park data, click View () on the far right of the park’s name.
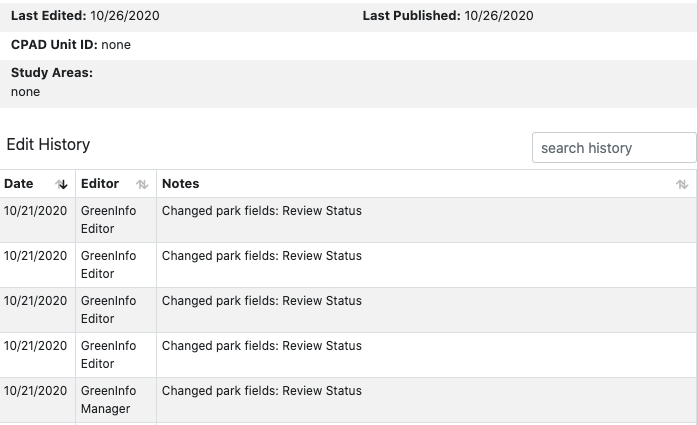
- To see recent changes, view the top item listed under Edit History towards the bottom of the park entry.
- To see older changes, scroll down on the right side.
- To find a specific edit, type a keyword of interest in the Search History search bar to the far right of Edit History.
The name of the user who made a specific change can be found under Editor to the left of the description for the change.
I need to make a change that will reduce park acreage or amenity count. What happens next?
You can make changes to the park acreage or amenity count that might result in a park with less acreages or less amenities.
On your account, open the park entry you wish to edit at laparksportal.org/parks/map/.
- To access the park data, click Edit () on the far right of the park’s name.
- Edit the park entry
- You’ll see a field tilted Acres. Use that field to edit the acres of your park. Any number you write, bigger or smaller, will be your new park acres.
- You’ll see an area titled Amenities with a list of existing amenities at your park. Use the existing fields to edit the amenities at your park. Any number you write or remove under Good, Fair and Poor should reflect your new list of amenities.
- To submit your changes to RPOSD, click Publish.
The RPOSD grant manager will get an email about your suggestion and can decide whether to approve the change or not. These types of changes are considered a suggestion to be reviewed by an RPOSD grant manager once your park entry is Published. The RPOSD grant manager may contact you to follow up on the reduced park acreage or reduced amenity count.
If the RPOSD grant manager approves of the reduction of park acreage or amenity count, they replace the original number with the new one you submitted. If the RPOSD grant manager does not approve your suggestion, then they keep the original number in the park entry.
Learn how to add a Park or Amenity by visiting the Adding new parkland and amenities section.
Which agencies can update which parks?
The LA Parks Portal tracks both the owners and the managers of each park in LA County. Most often, these are the same, but in some cases, an agency like the California Department of Parks and Recreation might own a park, but it might be managed by a local county or city parks department.
Both the Owner and the Manager of a park can edit and publish park inventory updates. Once the park is updated, both agencies would also show that park as current in their accounts.
The owning and managing agency of a park can also change either the owner or the manager, so long as their own agency remains in one of those roles. (In other words, you can’t lock yourself out of editing a park.) If there is a park to which your agency doesn’t have edit privileges but should, or to which you have access but should not, email info@laparksportal.org with a link to the park page and we’ll review and correct the error.
Exporting Data
I need to use my agency’s park data in an internal system. How do I export all the data to use in my internal system, archive or do analysis of my parkland?
You can export and download your park inventory data from the LA Park Portal. You can create an archive to keep for your records by exporting all data as last published. Older data is not available for download.
- Go to the Dashboard page of your account.
- On the far right corner of the screen Click Download Data (
 )
)

Note: Check your downloads folder for a Zip file with your park inventory data. These files can be opened on almost any computer.
Email Updates
What are email notifications and what information will I be receiving?
You can get email notifications with up to date information on changes to your park inventory. By default, the LA Parks Portal sends you a weekly update. The LA Parks Portal automatically sends you a digest where you can see:
- the upcoming due date for the park inventory,
- a list of parks that will require updates in the next month and,
- the number of parks that still have pending changes.
You can change this setting at any time. Important: when you opt out, the LA PArks Portal automatically stops sending you updates on the status of your inventory.
How do I opt out from email updates?
You can turn off email notifications by:
- From the top menu, click Profile
- From the options, select Your Profile
- To change your email notification preferences, click the dropdown menu under Subscribe to weekly emails of park inventory status.
- Select the option Do not send me weekly summary emails.
- At the bottom of the page, click Save Changes.
I don’t seem to be receiving my email notifications.
Make sure your email notifications are not in the spam folder and check that your settings are turned on notifications for email notifications.
To avoid your notifications going to the spam folder make sure you’ve added info@laparksportal.org to your safe email list.
Turn on your email notifications by:
- On your Dashboard, click Profile.
- From the options, select Your Profile.
- To change your email notification preferences, click the dropdown menu under Subscribe to weekly emails of park inventory status.
- Select the option Send me weekly email summaries.
- At the bottom of the page, click Save Changes.
Limiting my Dashboard to one or more Study Areas
Measure A divided the county up into 188 Study Areas. You can see the Study Areas and read more about them at lacountyparkneeds.org. Most agencies are in a single Study Area, so there’s no need to filter your parks any further. For larger agencies, it might be useful to limit your account to just the Study Area or Areas where you work. You can change this any time, and the Dashboard will reflect either all your agency’s parks or just those in the Study Areas you have selected.
You can do that by:
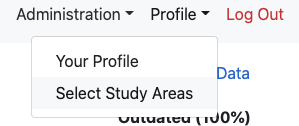
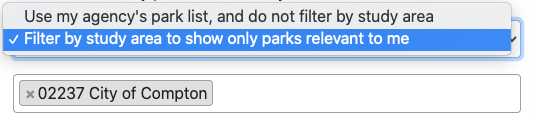
- Click on your Profile link in the top menu and picking Select Study Areas. Then in the next menu, choose the option Filter by study area to show only parks relevant to me.
- Finally, pick one or more study areas by name. If you’re not sure which Study Areas to select, consult the map at lacountyparkneeds.org.
- Click Save Changes and then the Dashboard and Map results will show results limited to the Study Area or Areas you have selected. You can change this setting at any time.
Exporting Data
How do I export all the data to use in my internal system, archive or do analysis of my parkland?
You can export and download the park inventory data from the LA Parks Portal. You can create an archive to keep for your records by exporting all data as last published. Older data is not available for download.
- Go to the Dashboard page of your account.
- On the far right corner of the screen Click Download All Data ()
Note: Check your downloads folder for a Zip file with your park inventory data. These files can be opened on almost any computer.
Privacy Policy
This site is governed by the RPOSD’s overall privacy policy, which you can find here.